Introduction
We will install Elasticsearch and Kibana. We will use the CA made by Elasticsearch to create privately signed TLS certs for both Elasticsearch and Kibana as per original documentation. We will use IP addresses to access both Elasticsearch and Kibana.
Source Code: Found on Github
Requirements
In the video, we used one instance of Ubuntu 24.04 running on a VM with 8GB memory. VM will run in a local private network. We install both elastic and kibana to this same server.
Steps
Step 1 - Update Ubuntu
The Ubuntu installations is brand new. We update the distribution as well as install some tools we typically use on both machinese.
apt-get update && apt dist-upgrade -y && apt-get install -y vim curl zip gnupg gpg
Step 2 - Install Elasticsearch
The Ubuntu installations needs these dependencies, so run these commands on both:
wget -qO - https://artifacts.elastic.co/GPG-KEY-elasticsearch | sudo gpg --dearmor -o /usr/share/keyrings/elasticsearch-keyring.gpg
echo "deb [signed-by=/usr/share/keyrings/elasticsearch-keyring.gpg] https://artifacts.elastic.co/packages/9.x/apt stable main" | sudo tee /etc/apt/sources.list.d/elastic-9.x.list
apt-get update;
apt-get install -y apt-transport-https;
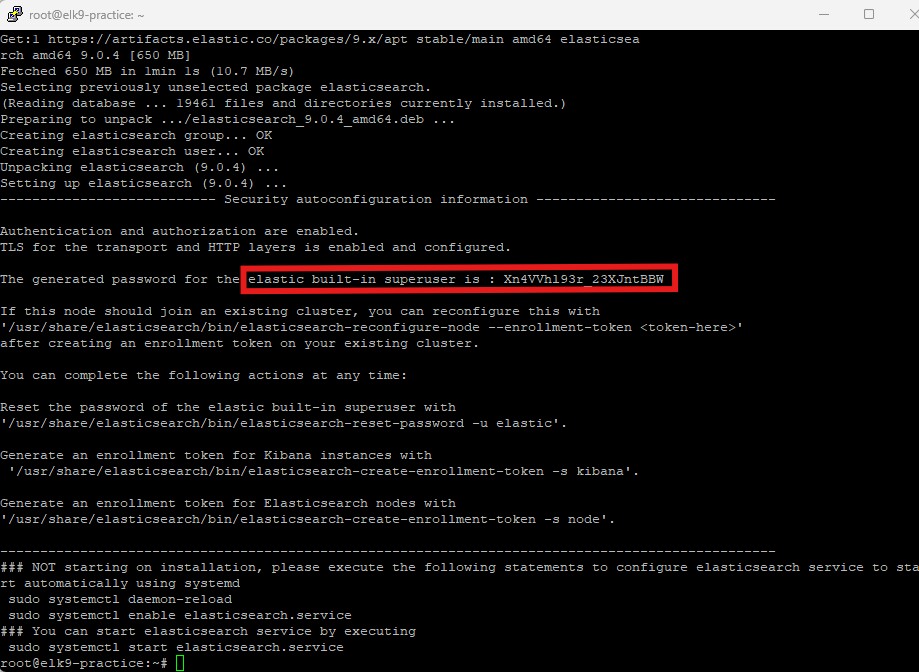
apt-get install -y elasticsearch;
When installation is complete, make sure you write down the password.

Step 3 - Configure Elasticsearch
Edit elasticsearch.yml
Go to the /etc/elasticsearch/elasticsearch.yml file. Edit the following fields:
...etc...
cluster.name: {anything you want}
...etc...
network.host: 0.0.0.0
...etc...
Note: you can also replace network.host: 0.0.0.0 with the ip address of the machine you want other systems to reference.
Change ownership
chown -R elasticsearch:elasticsearch /etc/elasticsearch
Step 4 - Start Elasticsearch
Start elasticsearch with these commands:
systemctl enable elasticsearch;
systemctl daemon-reload;
systemctl start elasticsearch;
Confirm elasticsearch is working with this command:
curl -X GET -u elastic:<password from step 2> https://{ip address of server}:9200 --cacert /etc/elasticsearch/certs/http_ca.crt
And you should see something like this:

Step 5 - OPTIONAL - Change Elastic Password
You can change the password of your Elasticsearch instance with this command /usr/share/elasticsearch/bin/elasticsearch-reset-password -u elastic -i. You can omit the -i flag if you want to autogenerate the password.
Step 6 - Install Kibana
Since Kibana uses all the same dependencies as elasticsearch, you can gert straight to installing kibana like this:
apt-get install -y kibana;
Step 7 - Make Certificates for Kibana
Let's make certificates for Kibana. You will need the /usr/share/elasticsearch/bin/elasticsearch-certutil command, and the CA files for elasticsearch. Since Kibana is on the same server as the elasticsearch server, we have access to all these resources.
We must first extract the CA private key file from the /etc/elasticsearch/http.p12. To do this, you must know the password to the http.p12 file, which is stored in the Elasticsearch keystore. See a list of all keystore pairs with this command:
/usr/share/elasticsearch/bin/elasticsearch-keystore list

The xpack.security.http.ssl.keystore.secure_password is what you want. So you can see the password like this:
/usr/share/elasticsearch/bin/elasticsearch-keystore show xpack.security.http.ssl.keystore.secure_password
Now you can extract the private key from from the http.p12 using this openssl command and make a http_ca.key (enter the password when prompted):
openssl pkcs12 -in /etc/elasticsearch/certs/http.p12 -nodes -nocerts -out /etc/elasticsearch/certs/http_ca.key
You now have the CA private key as http_ca.key. Keep http_ca.key secret and never let it leave the elasticsearch server. Or delete the http_ca.key as soon as your done with it. You can always re-create it by repeating the steps above.
Run this command to make the Kibana TLS files:
/usr/share/elasticsearch/bin/elasticsearch-certutil cert \
  --out /etc/kibana/kibana.zip \
  --name kibana \
  --ca-cert /etc/elasticsearch/certs/http_ca.crt \
  --ca-key /etc/elasticsearch/certs/http_ca.key \
  --ip {ip address of server} \
  --pem;
cd /etc/kibana/;
unzip kibana.zip
mv kibana certs
cp /etc/elasticsearch/certs/http_ca.crt  /etc/kibana/certs/
chown -R kibana:kibana /etc/kibana
Step 8 - Configure Kibana
Go to the /etc/kibana/kibana.yml file. Edit the following fields:
Edit Kibana.yml
server.host: 0.0.0.0
server.publicBaseUrl: "https://{ip address of server}:5601"
server.ssl.enabled: true
server.ssl.key: /etc/kibana/certs/kibana.key
server.ssl.certificate: /etc/kibana/certs/kibana.crt
server.ssl.certificateAuthorities: /etc/kibana/certs/http_ca.crt
Start Kibana
systemctl enable kibana
systemctl daemon-reload
systemctl start kibana
systemctl status kibana
The systemctl status kibana should show something like this after a minute or so:

I highlighted in red the URL you should visit, except replace 0.0.0.0 with the actual ip address of your machine. Remember to copy the query string part too ?code=____.
On the web page, you will be asked for an enrollment token.
Create Enrollment Token
Run this command on the Elasticsearch server:
/usr/share/elasticsearch/bin/elasticsearch-create-enrollment-token -s kibana
Paste this token into your Kibana website and press Configure.
If you are asked for a verification code, you can run this command to get it:
/usr/share/kibana/bin/kibana-verification-code
You can now login to Kibana with the elastic user and password you established earlier.
Step 9 - Hide Service Token
Go to your /etc/kibana/kibana.yml and locate this line:

This value should be a secret. Let's use the kibana keystore to hide it.
/usr/share/kibana/bin/kibana-keystore add elasticsearch.serviceAccountToken
When prompted, paste in the service token.
Now delete the line elasticsearch.serviceAccountToken: ... from ther kibana.yml file.
Restart Kibana
systemctl restart kibana
Go back to your web browser and enjoy!