Introducción
Código en Github: Clúster de Elasticsearch
Configuraremos un clúster de Elasticsearch con 5 nodos diferentes. Integraremos Kibana. Usaremos certificados autofirmados para el protocolo de transporte de Elasticsearch. Usaremos certificados Let's Encyrpt firmados públicamente para la API REST de Elasticsearch.
Damos por hecho que ya ha creado certificados SSL con firma pública (p. ej., Let's Encrypt). Si aún no tiene certificados SSL con firma pública,siga estas instrucciones para generar certificados SSL Let's Encrypt gratuitos.
Requisitos
Este video utilizará seis instancias de máquinas virtuales diferentes de un proveedor de servicios en la nube. Para variar, algunas máquinas usarán Ubuntu 20.04 y otras, Ubuntu 22.04.
Hemos mapeado los dominios node1.evermight.net, node2.evermight.net, node3.evermight.net, node4.evermight.net, node5.evermight.net y kibana.evermight.net a cada una de las 6 máquinas.
Pasos
Paso 1 - Actualizar Ubuntu [03:35]
Todas las instalaciones de Ubuntu son completamente nuevas. Actualizamos la distribución e instalamos algunas herramientas que solemos usar en todas las máquinas.
apt-get update && apt dist-upgrade -y && apt-get install -y vim curl gnupg gpg
Paso 2: Instalar Elasticsearch [05:10]
Instalar Elasticsearch en node1 a node5 ejecutando estos comandos en todos ellos.
wget -qO - https://artifacts.elastic.co/GPG-KEY-elasticsearch | sudo gpg --dearmor -o /usr/share/keyrings/elasticsearch-keyring.gpg;
echo 'deb [signed-by=/usr/share/keyrings/elasticsearch-keyring.gpg] https://artifacts.elastic.co/packages/8.x/apt stable main' | sudo tee /etc/apt/sources.list.d/elastic-8.x.list;
apt-get update;
apt-get install -y apt-transport-https;
apt-get install -y elasticsearch;
Paso 3: Configurar node1.evermight.net [07:10]
Ir a node1.evermight.net.
Copiar certificados SSL:
mkdir -p /etc/elasticsearch/certs/node1.evermight.net/
Sube tus certificados al directorio.
Editar elasticsearch.yml
Ir a la /etc/elasticsearch/elasticsearch.yml archivo. Edite los siguientes campos:
cluster.name: es-demo
node.name: node1
network.host: node1.evermight.net
http.port: 9200
cluster.initial_master_nodes: ["node1"]
Elasticsearch.yml completo disponible en github
Note-Lo hacemos NO Utilice el SSL firmado públicamente para http todavía en node1.evermight.net. Necesitamos conservar los certificados autofirmados para usar las herramientas de línea de comandos y generar tokens de inscripción para que nuestros nodos se unan al clúster. En el último paso, reemplazaremos los certificados autofirmados por los certificados públicos. Si necesitamos usar las herramientas de línea de comandos de nuevo, debemos volver a usar los certificados autofirmados.
Cambiar de propietario
chown -R elasticsearch:elasticsearch /etc/elasticsearch
Paso 4 - Iniciar node1.evermight.net [13:45]
Inicie elasticsearch con estos comandos:
systemctl enable elasticsearch;
systemctl daemon-reload;
systemctl start elasticsearch;
Restablecer contraseña elástica
Restablecer la contraseña del usuario elástico con este comando:
/usr/share/elasticsearch/bin/elasticsearch-reset-password -i -u elastic
Escriba una contraseña cuando se le solicite.
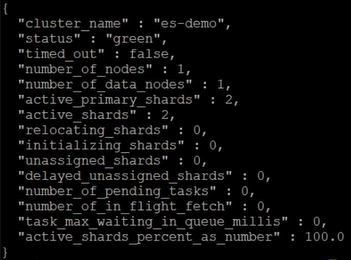
Confirme que elasticsearch está funcionando con este comando:
curl -k -u elastic:<password> https://node1.evermight.net:9200/_cluster/health?pretty
Deberías ver algo como esto:

Otros comandos útiles
Los siguientes comandos también pueden ser útiles para realizar comprobaciones de estado e investigaciones:
curl -k -u elastic:<password> https://node1.evermight.net:9200/_cat/nodes?pretty
curl -k -u elastic:<password> https://node1.evermight.net:9200/_cat/master?pretty
Paso 5: Configurar node2.evermight.net [16:10]
Únase con token de inscripción
Ir a node1.evermight.net y ejecute este comando para crear un token de inscripción:
/usr/share/elasticsearch/bin/elasticsearch-create-enrollment-token -s node
Ir a node2.evermight.net y ejecute este comando para aceptar el token de inscripción:
/usr/share/elasticsearch/bin/elasticsearch-reconfigure-node --enrollment-token <paste the token>
Confirmar que el /etc/elasticsearch/elasticsearch.yml de node2.evermight.net tiene una discovery.seed_hosts que menciona la dirección IP de node1.evermight.net.
Copiar certificados SSL:
mkdir -p /etc/elasticsearch/certs/node2.evermight.net/
Sube tus certificados al directorio.
Editar elasticsearch.yml
Ahora debes realizar algunas modificaciones finales al /etc/elasticsearch/elasticsearch.yml de node2.evermight.net. Edite estos campos:
cluster.name: es-demo
node.name: node2
network.host: node2.evermight.net
http.port: 9200
transport.host: 0.0.0.0
xpack.security.http.ssl:
  enabled: true
  key: certs/node2.evermight.net/privkey1.pem
  certificate: certs/node2.evermight.net/fullchain1.pem
Elasticsearch.yml completo disponible en github
Cambiar de propietario
chown -R elasticsearch:elasticsearch /etc/elasticsearch
Paso 6 - Iniciar node2.evermight.net [26:00]
Inicie elasticsearch con estos comandos:
systemctl enable elasticsearch;
systemctl daemon-reload;
systemctl start elasticsearch;
Confirme que elasticsearch está funcionando con este comando:
curl -k -u elastic:<password> https://node1.evermight.net:9200/_cluster/health?pretty
Confirme que hay dos nodos en el clúster con este comando:
curl -k -u elastic:<password> https://node1.evermight.net:9200/_cat/nodes?pretty
También puedes hacer ping node2.evermight.net para obtener resultados similares.
Paso 7: Configurar e iniciar el nodo 3, el nodo 4 y el nodo 5 [27:26]
Puede repetir el paso 5 y el paso 6 para node3.evermight.net, node4.evermight.net, node5.evermight.net.
Paso 8 - Limpiar node1.evermight.net - inicialmaestronodos y SSL firmado públicamente [30:10]
Regresar a node1.evermight.net y editar el /etc/elasticsearch/elasticsearch.yml Para utilizar el SSL público firmado.
xpack.security.http.ssl:
  enabled: true
  key: certs/node1.evermight.net/privkey1.pem
  certificate: certs/node1.evermight.net/fullchain1.pem
También comenta el cluster.initial_master_nodes porque eso debería ser determinado completamente por el clúster en cada reinicio.
Aquí está el elasticsearch.yml para reinicios posteriores de node1.evermight.net.
Luego reinicie node1.evermight.net
systemctl restart elasticsearch.service
Paso 9: Actualizar los hosts de semillas [32:15]
En el /etc/elasticsearch/elasticsearch.yml de todos los nodos, actualizar el discovery.seed_hosts para referenciar cada nodo:
// replace with actual ip addresses
discovery.seed_hosts:
  - 1.1.1.1
  - 1.1.1.2
  - 1.1.1.3
  - 1.1.1.4
  - 1.1.1.5
De esta manera, cualquier nodo que abandone el clúster sabrá cómo volver a unirse al clúster consultando el discovery.seed_hosts.
Paso 10 - Instalar Kibana [42:30]
Ejecute este comando en el kibana.evermight.net Máquina para instalar Kibana:
wget -qO - https://artifacts.elastic.co/GPG-KEY-elasticsearch | sudo gpg --dearmor -o /usr/share/keyrings/elasticsearch-keyring.gpg;
echo 'deb [signed-by=/usr/share/keyrings/elasticsearch-keyring.gpg] https://artifacts.elastic.co/packages/8.x/apt stable main' | sudo tee /etc/apt/sources.list.d/elastic-8.x.list;
apt-get install -y apt-transport-https;
apt-get install -y kibana;
Paso 11 - Configurar Kibana [43:30]
Copiar certificados SSL:
Ve a tu kibana.evermight.net servidor y ejecute este comando:
mkdir /etc/kibana/certs/kibana.evermight.net
A continuación, copie sus certificados SSL en el /etc/kibana/cert/kibana.evermight.net.
Editar kibana.yml
Ir a la /etc/kibana/kibana.yml archivo. Edite los siguientes campos:
server.port: 5601
server.host: 0.0.0.0
server.publicBaseUrl: "https://kibana.evermight.net:5601"
server.ssl.enabled: true
server.ssl.key: /etc/kibana/certs/kibana.evermight.net/priv1.key
server.ssl.certificate: /etc/kibana/certs/kibana.evermight.net/fullchain1.pem
elasticsearch.hosts: ["https://node1.evermight.net:9200"]
elasticsearch.ssl.verificationMode: full
Note- Solo agregue hosts que tengan la /etc/elasticsearch/service_tokens hacia elasticsearch.hosts. Hosts sin el service_tokens El archivo no podrá autenticar Kibana.
Crear token de servicio
Ejecute este comando desde cualquier servidor:
curl -X POST -u elastic:<password> https://node1.evermight.net:9200/_security/service/elastic/kibana/credential/token/kibana_token
Copia el token que ves.
Ejecute este comando en el servidor Kibana:
/usr/share/kibana/bin/kibana-keystore add elasticsearch.serviceAccountToken
Pegue el token después del mensaje.
Paso 12 - Iniciar Kibana [52:30]
systemctl enable kibana;
systemctl start kibana;
Ya puedes visitarnos https://kibana.evermight.net:5601/ e iniciar sesión con elastic y la contraseña del paso 4.