
Introduction
We will set up logstash as per this documentation and have it work with version 9 of Elasticsearch and Kibana. We assume you already have Elasticsearch and created as per this tutorial, although you can ignore install Kibana if you do not need the UI Dev Tools (we can use CURL commands to inspect data).
If you have some familiarity with Logstash and want to get straight to using systemd, go to the final step.
Requirements
In the video, we used one instance of Ubuntu 24.04 running on a VM with 8GB memory. VM will run in a local private network. We will install elastic and logstash to this server.
Steps
Step 1 - Update Ubuntu
The Ubuntu installations is brand new. We update the distribution as well as install some tools we typically use on both machines.
apt-get update && apt dist-upgrade -y && apt-get install -y vim curl zip jq gnupg gpg
Step 2 - Install Logstash
The Ubuntu installations needs these dependencies, so run these commands on both:
wget -qO - https://artifacts.elastic.co/GPG-KEY-elasticsearch | sudo gpg --dearmor -o /usr/share/keyrings/elasticsearch-keyring.gpg
echo "deb [signed-by=/usr/share/keyrings/elasticsearch-keyring.gpg] https://artifacts.elastic.co/packages/9.x/apt stable main" | sudo tee /etc/apt/sources.list.d/elastic-9.x.list
apt-get update;
apt-get install -y apt-transport-https;
apt-get install -y logstash;
Step 3 - Test Logstash Basics
In the latest versions of Logstash (unlike earlier versions), you can only run command line tools with a non-root user, otherwise you get warnings. (We will show systemd method in final step). To use command line tools, let us create an unprivileged user.
adduser em
Login as the em user:
su em
cd ~
Now test Logstash with this.
/usr/share/logstash/bin/logstash -e 'input { stdin { } } output { stdout {} }' --path.settings /home/em --path.data /home/em
Now every time you type something, it is immediately printed to stdout:
The stdin plugin is now waiting for input:
hello world
{
    "@timestamp" => 2025-07-28T22:38:19.282255105Z,
       "message" => "hello world",
         "event" => {
        "original" => "hello world"
    },
      "@version" => "1",
          "host" => {
        "hostname" => "logstash"
    }
}
You can press CTRL C to stop the logstash process.
Step 4 - Test Logstash Elasticsearch Output
Copy http_ca.crt
As the root user:
cp /etc/elasticsearch/certs/http_ca.crt /home/em/
chown -R em:em /home/em
Ingest CSV and Output to Elasticsearch
In next few steps, we will use the em user.
Make this /home/em/customers.csv:
email,first_name,last_name,city,county,state,zip,web
carol.davis@example.net,Carol,Davis,Seattle,King,WA,98101,www.caroldavisexample.net
faizal@helloworldexample.com,Faizal,Gupta,Kingston,King,WA,93211,www.helloworldexample.com
Make this /home/em/customers.conf:
input {
  file {
    path => "/home/em/customers.csv"
    start_position => "beginning"
    sincedb_path => "/dev/null"
  }
}

filter {
  csv {
    separator => ","
    skip_header => "true"
    columns => ["email", "first_name", "last_name", "city", "county", "state", "zip", "web"]
  }

  mutate {
    convert => { "zip" => "integer" }
  }
}

output {
  elasticsearch {
    hosts => ["${ES_HOST}"]
    ssl_enabled => true
    ssl_certificate_authorities => "/home/em/http_ca.crt"
    user => "elastic"
    password => "${ES_PASS}"
    index => "customers"
    document_id => "%{email}"
  }

  stdout { codec => rubydebug }
}
We will use an environment variable for ES_HOST.
We must set the ES_PASS. Since it is sensitive information, let's do this with the keystore:
/usr/share/logstash/bin/logstash-keystore create --path.settings /home/em
/usr/share/logstash/bin/logstash-keystore add ES_PASS --path.settings /home/em
Now you can start things up:
export ES_HOST="https://192.168.88.7:9200" && \
/usr/share/logstash/bin/logstash -f /home/em/customers.conf --path.settings /home/em --path.data /home/em
See the results:
curl -u elastic:ABCD1234 https://192.168.88.7:9200/customers/_search --cacert /home/em/http_ca.crt | jq .
Step 5 - Test Multiple Pipelines
Let's run multiple pipelines simultaneously. We will create a new pipeline called /home/em/tasks.conf:
input {
  file {
    path => "/home/em/tasks.csv"
    start_position => "beginning"
    sincedb_path => "/dev/null"
  }
}
filter {
  csv {
    separator => ","
    skip_header => "true"
    columns => ["task_name", "task_description"]
  }
}
output {
  elasticsearch {
    hosts => ["${ES_HOST}"]
    ssl_enabled => true
    ssl_certificate_authorities => "/home/em/http_ca.crt"
    user => "elastic"
    password => "${ES_PASS}"
    index => "tasks"
  }

  stdout { codec => rubydebug }
}
We will ingest /home/em/tasks.csv, which should have this content:
task_name,task_description
eat pizza,time to enjoy pizza
drink water,stay hydrated
Let's add one more entry to /home/em/customers.csv:
samo@hane.com,Samo,Hane,1st Street,NY,20192,www.samo.com
And let's create a /home/em/pipelines.yml with this contnet:
- pipeline.id: customers
  path.config: "/home/em/customers.conf"
- pipeline.id: tasks
  path.config: "/home/em/tasks.conf"
The pipelines.yml file must be in the directory specified by --path.settings.
Now let's run both pipelines customers.conf and tasks.conf:
export ES_HOST="https://192.168.88.7:9200" && \
/usr/share/logstash/bin/logstash --path.settings /home/em --path.data /home/em
See the results:
curl -u elastic:ABCD1234 https://192.168.88.7:9200/tasks/_search --cacert /home/em/http_ca.crt | jq .
curl -u elastic:ABCD1234 https://192.168.88.7:9200/customers/_search --cacert /home/em/http_ca.crt | jq .
Step 6 - Run Logstash as a Service
Login as the root user.
We repeat all the steps above, but under default logstash file system organization and add some more test data.
mkdir -p /var/lib/logstash/certs/
cp /etc/elasticsearch/certs/http_ca.crt /var/lib/logstash/certs/

mkdir -p /var/lib/logstash/data/

cat > /var/lib/logstash/data/customers.csv <<EOL
email,first_name,last_name,city,county,state,zip,web
cappy@example1.com,Cappy,Do,Toronto,King,WA,98101,www.example1.com
bluey@example2.net,Bluey,Whaly,Miami,King,WA,83211,www.example2.net
EOL

cat > /etc/logstash/conf.d/customers.conf <<'EOL'
input {
  file {
    path => "/var/lib/logstash/data/customers.csv"
    start_position => "beginning"
    sincedb_path => "/dev/null"
  }
}

filter {
  csv {
    separator => ","
    skip_header => "true"
    columns => ["email", "first_name", "last_name", "city", "county", "state", "zip", "web"]
  }

  mutate {
    convert => { "zip" => "integer" }
  }
}

output {
  elasticsearch {
    hosts => ["${ES_HOST}"]
    ssl_enabled => true
    ssl_certificate_authorities => "/var/lib/logstash/certs/http_ca.crt"
    user => "elastic"
    password => "${ES_PASS}"
    index => "customers"
    document_id => "%{email}"
  }

  stdout { codec => rubydebug }
}
EOL

cat > /var/lib/logstash/data/tasks.csv <<EOL
task_name,task_description
do homework,children love homework
wash dishes,dad loves to wash dishes
EOL
cat > /etc/logstash/conf.d/tasks.conf <<'EOL'
input {
  file {
    path => "/var/lib/logstash/data/tasks.csv"
    start_position => "beginning"
    sincedb_path => "/dev/null"
  }
}
filter {
  csv {
    separator => ","
    skip_header => "true"
    columns => ["task_name", "task_description"]
  }
}
output {
  elasticsearch {
    hosts => ["${ES_HOST}"]
    ssl_enabled => true
    ssl_certificate_authorities => "/var/lib/logstash/certs/http_ca.crt"
    user => "elastic"
    password => "${ES_PASS}"
    index => "tasks"
  }

  stdout { codec => rubydebug }
}
EOL

cat > /etc/logstash/pipelines.yml <<'EOL'
- pipeline.id: customers
  path.config: "/etc/logstash/conf.d/customers.conf"
- pipeline.id: tasks
  path.config: "/etc/logstash/conf.d/tasks.conf"
EOL

chown -R logstash:logstash /var/lib/logstash
chown -R logstash:logstash /etc/logstash
At this point, we need to set the ES_HOST environment variable:
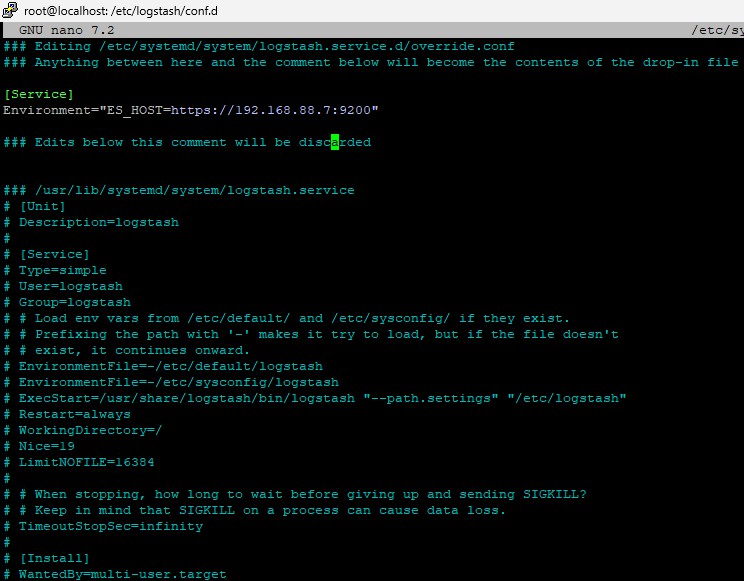
systemctl edit logstash.service
Then make this:
[Service]
Environment="ES_HOST=https://192.168.88.7:9200"
It should look like this:
And then add ES_PASS to the keystore:
/usr/share/logstash/bin/logstash-keystore create --path.settings /etc/logstash
/usr/share/logstash/bin/logstash-keystore add ES_PASS --path.settings /etc/logstash
Now start things up
systemctl enable logstash
systemctl daemon-reload
systemctl start logstash
Every so often you can check status with systemctl status logstash, or look in the /var/log/syslog.
You should be able to see contents in elasticsearch with:
curl --cacert /var/lib/logstash/certs/http_ca.crt -u elastic:ABCD1234 https://192.168.88.7:9200/customers/_search | jq .
curl --cacert /var/lib/logstash/certs/http_ca.crt -u elastic:ABCD1234 https://192.168.88.7:9200/tasks/_search | jq .